Sunday, March 26, 2023

Gluten Free Chocolate Crinkle Cookies


These cookies turned out excellent, but one note about the dough - this stuff is STICKY. I chilled it for an extra night in the fridge, thinking that might help. Nope! 

So the solution I worked out was simply to drop spoonfuls of the dough directly into the powdered sugar. I could not roll the dough into balls with my hands by itself; it was just all over the place, trying it like that, no matter what I did. But if you drop it directly into the powdered sugar, you can then roll it into balls.


GLUTEN FREE CHOCOLATE CRINKLE COOKIES

Ingredients

1 3/4 C almond flour
3/4 C unsweetened cocoa powder (Hershey’s brand was marked GF)
  • 1 tsp. 

    kosher salt

  • 1 tsp. 

    baking powder

  • 3/4 tsp. 

    baking soda

  • 1/2 C 

    (1 stick) butter, melted 

  • 3/4 C 

    granulated sugar 

  • 1/2 C 

    packed brown sugar 

  • 3 

    large eggs

  • Powdered sugar, for rolling
1. In a large bowl, combine the almond flour, cocoa powder, salt, baking powder, and baking soda. 

2. In another bowl, whisk the sugars into the butter. Add the eggs and whisk until well blended. Pour into dry ingredients and mix until just combined. (Dough will be STICKY.)  Chill at least two hours or overnight. 

3. Preheat oven to 350. Line baking sheets with parchment paper. Fill the bottom of a pie pan (or other flat dish) with powdered sugar. Drop dough by the spoonfuls directly into the powdered sugar. It was too sticky to roll into balls without being rolled in powdered sugar first! 

4. Space cookies out on the parchment paper. Once you have them all rolled and ready to go in the oven, give them each another quick roll in the sugar. (This makes for a more dramatic 'crinkle.')

5. Bake until cookies puff and crack, about 12-14 minutes. The edges should be set and the cracks still look slightly underdone. Let cool on the baking sheets. 

Saturday, March 18, 2023

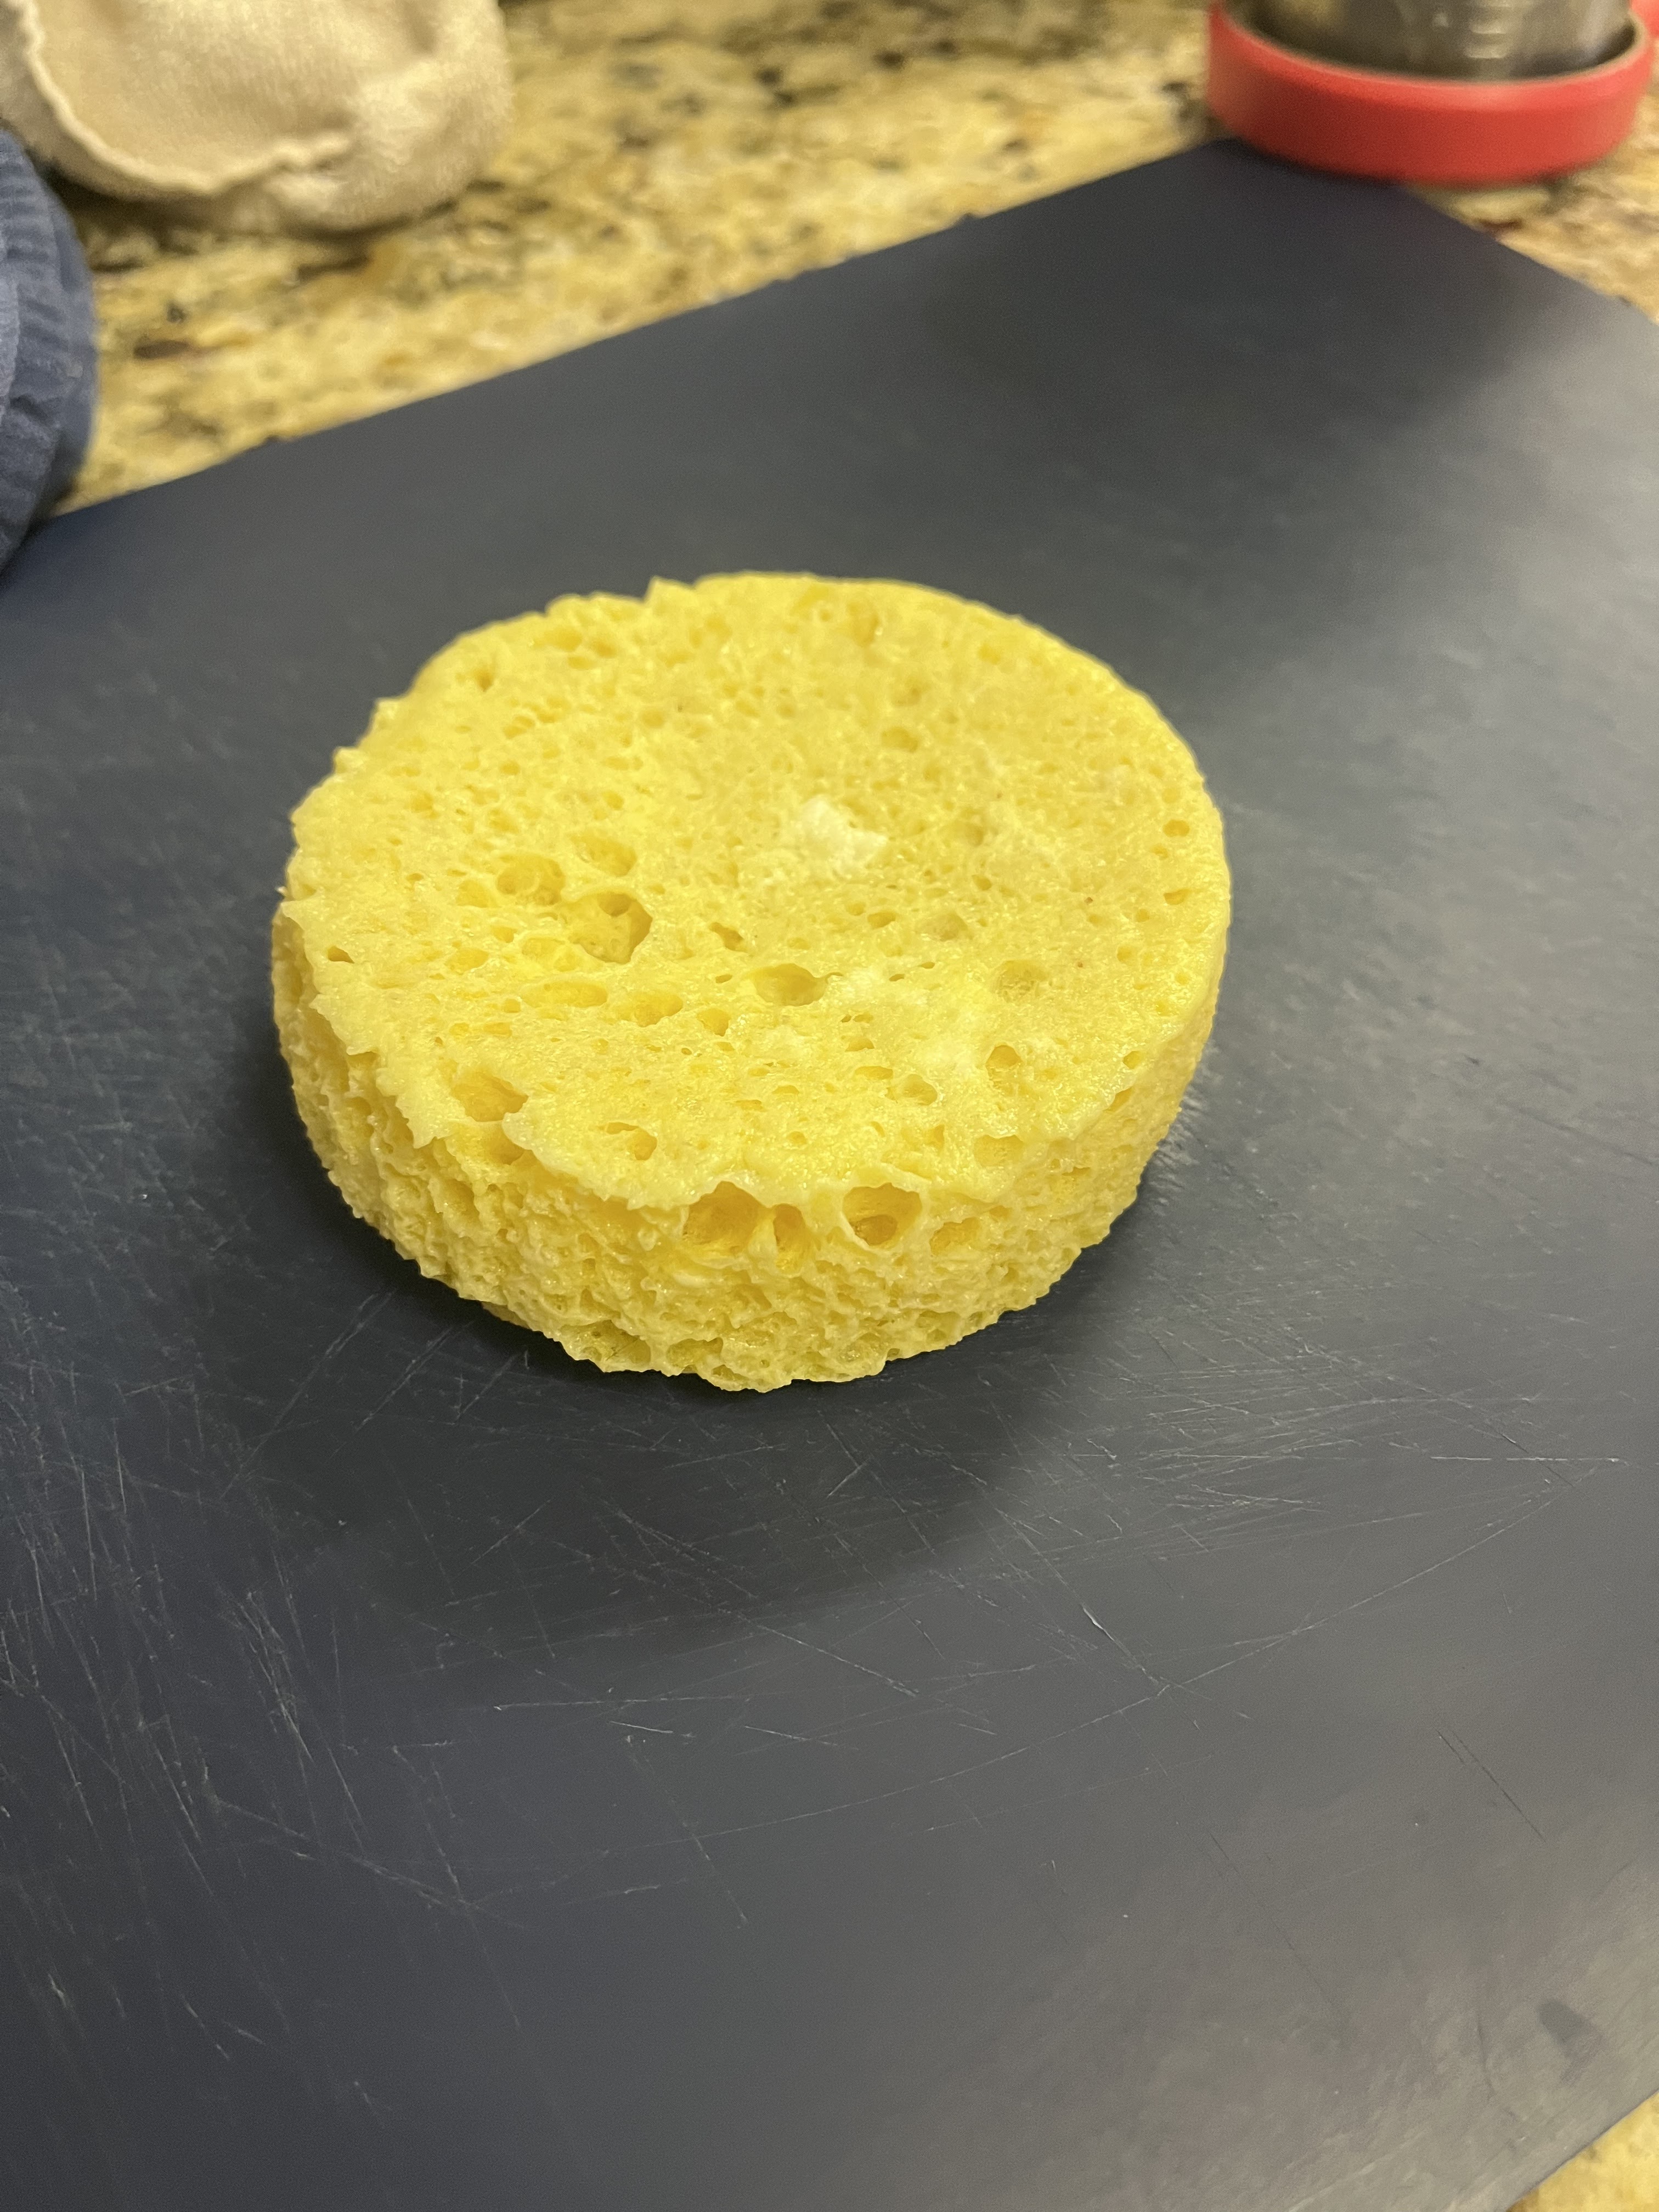
Super-Easy GF English Muffins


 You are simply not going to believe how quick and easy these are! They whip up with a fork in seconds, and only go in the microwave for a minute and a half. I let mine cool a bit while I beat up an egg for my sandwich (above) before cutting it in half and sticking it in the toaster oven there, and voila! Breakfast.


ENGLISH MUFFINS

Ingredients:
1T butter or margarine
1 egg
1T cream or half and half (I used fat free half and half)
2T almond flour
A grind of sea salt (just a pinch, if you don’t have a grinder)
1/2t baking powder

I used a regular-sized ramekin to cook it in. You’ll want something about that size, coated with pan spray.

In a microwave-safe bowl, melt the butter. With a fork, beat in the cream or half and half. Add the egg and beat well. Add almond flour, salt, and baking powder. Stir with the fork, and pour into the ramekin coated with pan spray.

Microwave 90 seconds.

Turn out on a cutting board, let cool slightly, and slice in half if you wish. 


Saturday, January 21, 2023

Pad See Ew

This is another Thai dish, like my favorite ‘Pad Thai’ itself, that is made with oriental rice noodles. I was scrolling back through my blog posts trying to find a link to one that taught you how to soak rice noodles - because you don’t have to boil these on the stove, like regular pasta! - but couldn’t find one, so you’re getting another set of instructions on that!


My recipe called for beef, but said that just about anything will work. It’s probably going to get tried with chicken breast next time! Anyhow, your meat is going to need to marinate while the rest is cooking, so you want to start that first. Cut into bite-sized strips and place in a bowl with a bit of ground pepper, about two cloves of minced garlic, and a 1/3C soy sauce (there are several GF brands, including the Amazon generic Happy Belly brand, La Choy, and the Tamari brand). Mix that together well, and set aside in the fridge while you cook your noodles and get your broccoli started.

(My Hamilton came sniffing around the beef in the kitchen. No, he does not get fed from either the kitchen or the table! But I am a messy cook, and do occasionally drop things.)


Rice Noodles: Your local Oriental Market is probably going to be your best bet for rice noodles, if you have one. Mine has started keeping real irregular hours since the pandemic started in 2020, so I’ve started buying mine online. Still, you can see they say ‘gluten free’ on them, and you want the XL (the widest ones) for this.


All you have to do is boil the water (I use my electric kettle), pour over the noodles in a large bowl, and keep stirring them so they don’t stick together. Drain when they’re done! I set the timer for 7 minutes for these, but it actually took them about nine. 

While those were soaking, I was doing my broccoli. I had about two pounds, roughly - lots of veggies in my pastas, as usual! - and was trimming it up. I steamed it for two minutes in the microwave, stirred, then did two more. You want it still fairly crisp, since it will go in the wok later. 

Then I whisked up my sauce in a two-cup measure: 
2T oyster sauce (Wok Mei brand is GF)
1T fish sauce (Thai Kitchen is GF)
1T soy sauce
1t granulated sugar

Like most stir fry’s, this will go together quick once your wok is heated, so you want everything mixed up, prepped, and ready to go in the wok before you actually start to heat anything up. The game plan for this one is: beef first, then we’ll add the broccoli, then we’ll remove that to a bowl to avoid overcooking anything; then we’ll toss the noodles with our stir fry sauce; then toss that all together. 

And as usual, you got no blogging during that process because as I said - that moves quick once you get it started! It turned out good, though. 


PAD SEE EW

INGREDIENTS
16oz wide (XL) oriental rice noodles
2 lbs broccoli
12oz beef for stir fry (this can be just about anything, from stew beef to sirloin)
2 minced cloves garlic 
Fresh ground pepper
1/3C soy sauce
Sauce:
    2T oyster sauce (Wok Mei brand is GF)
    1T fish sauce (Thai Kitchen is GF)
    1T soy sauce (Amazon Happy Belly, La Choy, and Tamari are all GF) 
    1t granulated sugar
Sesame seeds, for serving

Trim your beef into stir-fry bite-sized pieces. Set aside to marinate in a bowl in the fridge with 1/3C soy sauce, a couple of grinds of fresh pepper, and the minced cloves of garlic

Bring enough water to a boil to cover your noodles. Pour boiling water over your noodles in a heat-safe bowl (not metal!), and stir occasionally until done, 7-9 minutes. Drain and leave in the colander in the sink.

Trim broccoli. Microwave two minutes, tightly covered; then stir and microwave another two. 

Mix ingredients for your sauce together in a small bowl or two-cup measure. Stir well, until sugar is dissolved.

Coat your wok with pan spray. Empty the bowl with both beef and marinade into the wok. Stir fry over fairly high heat until just done. Add broccoli; stir until coated with sauce. Remove to a large bowl. 

If your noodles have gotten stiff, run some hot water over them in the colander, then put them back in the wok. Pour the sauce over the noodles, and toss until heated through and well coated. 

Toss into the large bowl with the broccoli and beef. I’m going to serve with extra soy sauce and sesame seeds. 

Servings: 8
Calories per serving: 285


Saturday, December 31, 2022

Quick Garlicky Shrimp and Spinach

 *Yes, ‘Garlicky’ is indeed a word, and that is indeed how you spell it! I looked it up. 


I needed something quick and light after all the feasting of Christmas week, and I had some really nice large shrimp in the freezer, so this is what I came up with. Just a quick garlic-powder-into-chicken-broth, wilted some spinach in the steam from that, and then sautéed the shrimp in some more of it.

It could go over rice very easily - you could even toss a little cornstarch in to thicken some of the broth, maybe - or over pasta. I wasn’t wanting something that heavy! I’m just eating the shrimp-and-spinach by itself this week, with some veggies on the side. 

I stirred quite a bit of garlic powder (social distancing is still in fashion, you know, so who cares about garlic breath, right?!) into about two cups of chicken broth in a four cup measure. Poured roughly half of that over some spinach, covered it tightly with plastic wrap (cut a small hole to vent!), and steamed it in the microwave for four minutes. 


I used quite a bit of spinach (a bag from Sam’s, so it was a bulk bag, 40 oz) since I’m not putting it over anything. You’d use less if you were topping rice or pasta with this, of course. Ditto the shrimp - I’m not totally sure how much I used, I think this is a three pound bag I have in the freezer, and I just grabbed a couple handfuls out to thaw.

You’re going to poach - cooking things in broth like this is ‘poaching’ rather than ‘sautéing,’ so you’re learning a new cooking technique, here! - your shrimp in the garlic chicken broth. Toss the rest of the broth and your shrimp in a skillet, turn on the heat to medium or so, and let them go until they’re pink. 


Pour everything in the skillet over the spinach, and voila! I’m calling it dinner.

I’m not even plating it, that’s how much of a holiday-recovery dinner this is. I’m putting it in a Tupperware so I can take it in the living room and eat it with my feet up on the ottoman! 


QUICK GARLICKY SHRIMP AND SPINACH

Ingredients
40oz fresh spinach
2C chicken broth
Garlic powder, to taste (I didn’t measure)
1lb large shrimp

Stir garlic powder broth in a four cup measure. Whisk well and set aside.

Put as much of your spinach as will fit in a large microwaveable bowl. Pour half the chicken broth over it, cover tightly (make sure it’s vented somehow!), and microwave for four minutes. Stir, add the rest of the spinach, and microwave another four minutes.

Poach your shrimp over medium high heat in the rest of the chicken broth. Once they turn pink, pour over your spinach and serve.

Optional: Serve over rice or pasta.

Wednesday, December 28, 2022

Rocky Road Gluten Free Fudge Cookies (Crispy)


These are a variation on my Gluten Free Fudge Cookes, but I think they turned out even better! Plus I found out that marshmallows puff up when you put them in the oven - can you see in the picture there? It was really neat, and they stayed puffed up, too, even as the cookies cooled.


Rocky road gluten free fudge cookies

INGREDIENTS
Cooking spray 
2 1/2 c. powdered sugar
3/4 c. unsweetened cocoa powder
1/4 tsp. kosher salt
cold large egg whites
1/2 tsp. pure vanilla extract
1/2 c. chocolate chips
1/2 c. mini marshmallows
1/2 c. chopped walnuts
DIRECTIONS
  1. Preheat oven to 350° and line two baking sheets with parchment paper and very lightly grease with cooking spray. In a large bowl, combine powdered sugar, cocoa powder, and salt. 
  2. Stir in egg whites and vanilla, then add chocolate chips, marshmallows, and nuts. For shinier cookies, rest dough at room temperature for 20 minutes. Scoop teaspoon-size mounds (no bigger! these things spread out) onto prepared baking sheets and bake until set, 10 to 12 minutes. Let cool for about 5 minutes on baking sheet then carefully transfer cookies to a cooling rack with a spatula to cool completely. 

Courtney’s Gluten Free Lemon Cake with Glaze

 Guest blogger recipe here!  This is a great light lemon cake that my sister bakes in a small loaf pan, rather loosely based on the lemon cake at Starbucks. It’s a favorite of my mother’s, so we wanted to share it with you here.

A note on the flours: I tend to use straight almond flour in baking, so you’ll see my recipes call for that. Courtney tends to use gluten free baking flour blends. This one is baked using the gluten free baking flour blend from Walmart, their gluten free all purpose flour blend.


CAKE INGREDIENTS:
3 eggs
1 C sugar
1 C sour cream or plain Greek yogurt
1/2 C vegetable oil
2 T lemon zest
2 T lemon extract
1 1/2 C gluten free baking flour blend
2 t baking powder
1/2 t salt

GLAZE INGREDIENTS
1 C powdered sugar
2-3 T lemon juice

Preheat oven to 350. Spray a 9x5 loaf pan with pan spray and lightly dust with flour. 

In a large bowl, beat the three eggs. Add sugar, sour cream/yogurt, and oil. Whisk until smooth. Add lemon zest and lemon extract, and stir well. 

In a smaller bowl, mix flour, baking powder, and salt. Stir the dry ingredients into the larger bowl, until just combined. Lumps are okay!

Bake ~50 minutes or until a knife inserted in the middle comes out clean. You can cover with foil the last ten minutes to prevent browning, if you prefer. 

Cool in pan at least thirty minutes before glazing. You can turn it out to glaze it after that, if you prefer.

We don’t have real exact amounts on the glaze - just start with these, and play with the amounts of sugar and lemon juice until you get it to a desired consistency. Drizzle or spread over the cake. 


Saturday, December 10, 2022

’Christmas’ Vegetable Soup

 You want to know how church musicians ever manage to have anybody - family, anybody - over during the holidays? Definitely nothing fancy! 


Large pots of soup are my general choice.
Large pots of relatively easy soup are even better.
I’ve done crock pots of my Stone Soup recipe a couple years; this year I ran into a slight difficulty with the recipe I originally wanted to make (how in the devil is everyone out of fresh spinach, for pete’s sake?!), so I’m literally just tossing one together today out of ingredients I’ve got in my kitchen/freezer/pantry. 

I’m using tomatoes - PRO TIP: Tomato soups and sauces are always better the day after! - so I’m putting it together in the stock pot on the stove today, eating a bit myself for supper tonight, and then the rest will go in the Crockpot on the ‘Warm’ setting while I’m in church tomorrow. It’s my Lessons and Carols service, so I have some extra family and friends coming to hear my choir and me. 

Starting with browsing some sausage. This is an Appleton Farms Aldi sausage that I like because it’s not too hot, works in many things, is marked ‘gluten free,’ and freezes well! (Aldi sells it refrigerated. I toss the rolls in the freezer to keep them handy.)


After the pork is browned, you’re going to want to set it aside on a couple paper towels to drain, and you’re going to need to pour the grease off somewhere, so you don’t pour it down your kitchen drain. Another PRO TIP? My favorite way to drain grease is simply cover a bowl with aluminum foil, set it in the sink, and pour your grease into it. You can then set the bowl aside while the grease hardens, ball the foil up and throw it away, grease and all, and never have to worry about cleaning grease off anything. Love. It. 


(Looks kind of disgusting, doesn’t it? Grease is kind of disgusting. This is why we drain it and don’t put it in the soup. Yep.)

All right, got that done.
Now I’m going to mash up my tomatoes, because what I have in my pantry is whole peeled San Mariano tomatoes. They’re my favorites. Just use your hands, toss the tomatoes and everything in your stock pot and just reach in and mash them up with your hands.

If you’re buying something and short on time? Diced tomatoes. The big cans! 

Potatoes? I had a five pound bag of russets. I’m dicing them and tossing them in.
Cans of potatoes work well in soup too! 

I’m going to toss in a frozen bag of peas and a frozen bag of corn too. 

Then, if you’re one of those who stocks broth in your pantry, fill it up with broth.
Me? I do bouillon. I have a small kitchen and a small pantry, and bouillon is easier to keep large quantities on hand! 

So I filled the stock pot up with water and Orrington Farms beef broth base (that’s my favorite marked-gluten-free brand), and set it on the stove to cook the potatoes. 


Voila! I’m leaving it there to simmer while I go finish practicing for tomorrow.
Musicians’ holiday entertaining: seriously, I suggest you try it. No joke!

Let me try to come up with some kind of ingredient list. 😊

‘CHRISTMAS’ VEGETABLE SOUP

Ingredients 
1lb hamburger or sausage
Α bag of potatoes, whatever you’ve got on hand
A large can or two of San Marzano tomatoes / diced tomatoes / whatever
A 12oz bag of frozen peas
A 12oz bag of frozen corn
Orrington Farms broth base / broth / bouillon (I didn’t measure this at all)

Brown your hamburger or sausage. Set it aside on paper towels to drain and cool a bit.

Dice your potatoes into bite-size pieces, or open the cans, if you have cans of potatoes. (If you’re using cans, don’t bother draining anything! Just toss it all in. Use less broth.)

Since I was using whole peeled tomatoes, I crushed up my tomatoes with my hands in my big stock pot. Then I added my raw diced potatoes, the drained sausage, and the peas and carrots. 

I added enough water to make it a good soup consistency - maybe 8 cups or so? Add broth base or bouillon to match your water; if you’re using boxed or canned broth, just add that to make a good soup consistency here.

Set it on the stove and bring it to a boil to cook the potatoes. After the potatoes are done, leave it on to simmer as long as you can! The longer it can simmer, the better it will taste. 


Gluten Free Soda Bread

  Now, this is very definitely a soda bread and not a yeast bread - I don’t want to give anybody the wrong idea of what you’re making! - but...