Thursday, November 21, 2024

The Famous Christmas Fudge

 Life is too short to hoard recipes, I decided today: you want to give the famous Christmas fudge a try, here it is, and more power to you!

I actually thought the recipe was pretty much fool-proof, to tell you the truth, but a choir member of mine (who is usually behind the deep-fryer at any church function, turning out hot apple hand pies, so a pretty stellar baker!) has trouble getting it to come out. Who knows. 


Here goes: This is it! 
Sum total of <EVERYTHING> you will need for one pan of fudge.

One small (18oz) peanut butter, 
One thing of frosting - this one is cream cheese, but whatever works - 
A spatula, 
A bowl to mix them in, 
And I use a loaf pan to cool the fudge in, because it’s a good size.

Take the lids off the frosting and peanut butter. If you can get the foil totally off without tearing it, that’s ideal, because that means you can put it in the microwave just like it is. If the foils tears, scoop it into the bowl before putting in the microwave.

DO NOT PUT THE FROSTING OR PEANUT BUTTER CONTAINERS IN THE MICROWAVE WITH ANY FOIL STILL STUCK ON THEM.


It all peeled off these nicely, so next we put them in the microwave for 45 seconds each!

[Ignore the second peanut butter there; I was making two batches at once.]

Once you’ve microwaved both your peanut butter and your frosting, pour them into the bowl together and stir until they’re well mixed.

I usually coat my loaf pans with pan spray. Not sure if that’s necessary? But that’s what I do.

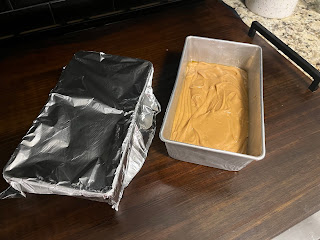
Pour the fudge into a load pan. Cover it with foil, and set it aside to cool overnight or for a day or so.


And then all you have to do is cut it, once it’s set up!

People love it, they really do. Hence the ‘Famous’ moniker. I’ve been giving it as gifts for years now. ❤️
Most of us really don’t need more ‘stuff’ at Christmas, but everybody appreciates Christmas candy!


Tuesday, November 19, 2024

Balsamic Bliss Bowls

One of the lunch bowls I meal-prep on weekends! 


For this one, I use brown rice that I make in the Instapot (recipe is here: Instapot Quinoa OR Brown Rice). For six lunches, I use a cup and a half of brown rice, which in the Instapot works out to just over a cup-and-three-quarters of water or broth.  You can always make the full two cups and have leftovers, of course!

I also used deli chicken this time, though sometimes I will use rotisserie chicken if I have it; fresh mozzarella; and the balsamic tomatoes.

The green beans were just cooling on the counter next to my rice bowls in this picture, but if you’re interested in my green bean recipes, they are here (Roasted Green Beans) and here (Instapot Green Beans)!


BALSAMIC BLISS BOWLS

Ingredients for 6 bowls
Brown rice, cooked (for six lunches, I cook a cup and a half of brown rice)
8oz fresh mozzarella 
Deli chicken or rotisserie chicken (I use 2oz per bowl)
Cherry tomatoes (as many as you’d like!)
A few tablespoons of balsamic vinegar

Go ahead and cook your rice, however you want to do that. Divide between six bowls.
*If you’re counting calories, it’s the equivalent of 160 calories per bowl I’m aiming at: a half-cup’s worth of uncooked rice. That’s how calories are measured on my bag of rice!

Roughly cut up your fresh mozzarella into bite-sized pieces. I use 8oz because that’s how it’s usually sold, no other reason! Divide equally between your six bowls on top of your rice.

Dice your chicken, again dividing between the rice bowls.

Cut all the cherry tomatoes in half and place in a cast iron skillet. (I don’t have a problem with them sticking at all in mine?) Drizzle a couple tablespoons of a good balsamic vinegar over the tomatoes, and turn the heat to medium. Keep stirring every couple of minutes until the tomatoes release their juices and turn kind of ‘sauce-y.’ 

Divide the tomatoes up on top of your rice bowls.

Servings: 6
Calories per serving: 335

Rocky Road Cookies (Soft)

 You will note that we have a distinction up here now between Soft Rocky Road Cookies and  Crispy Rocky Road Cookies ! The family decided th...